Wednesday, April 14, 2010

Making an easel for an artist


My husband is retired, lucky guy. He is playing with clay and wood these days. He likes to sculpt, but his most fun comes from figuring out HOW to do things, rather than actually doing them.

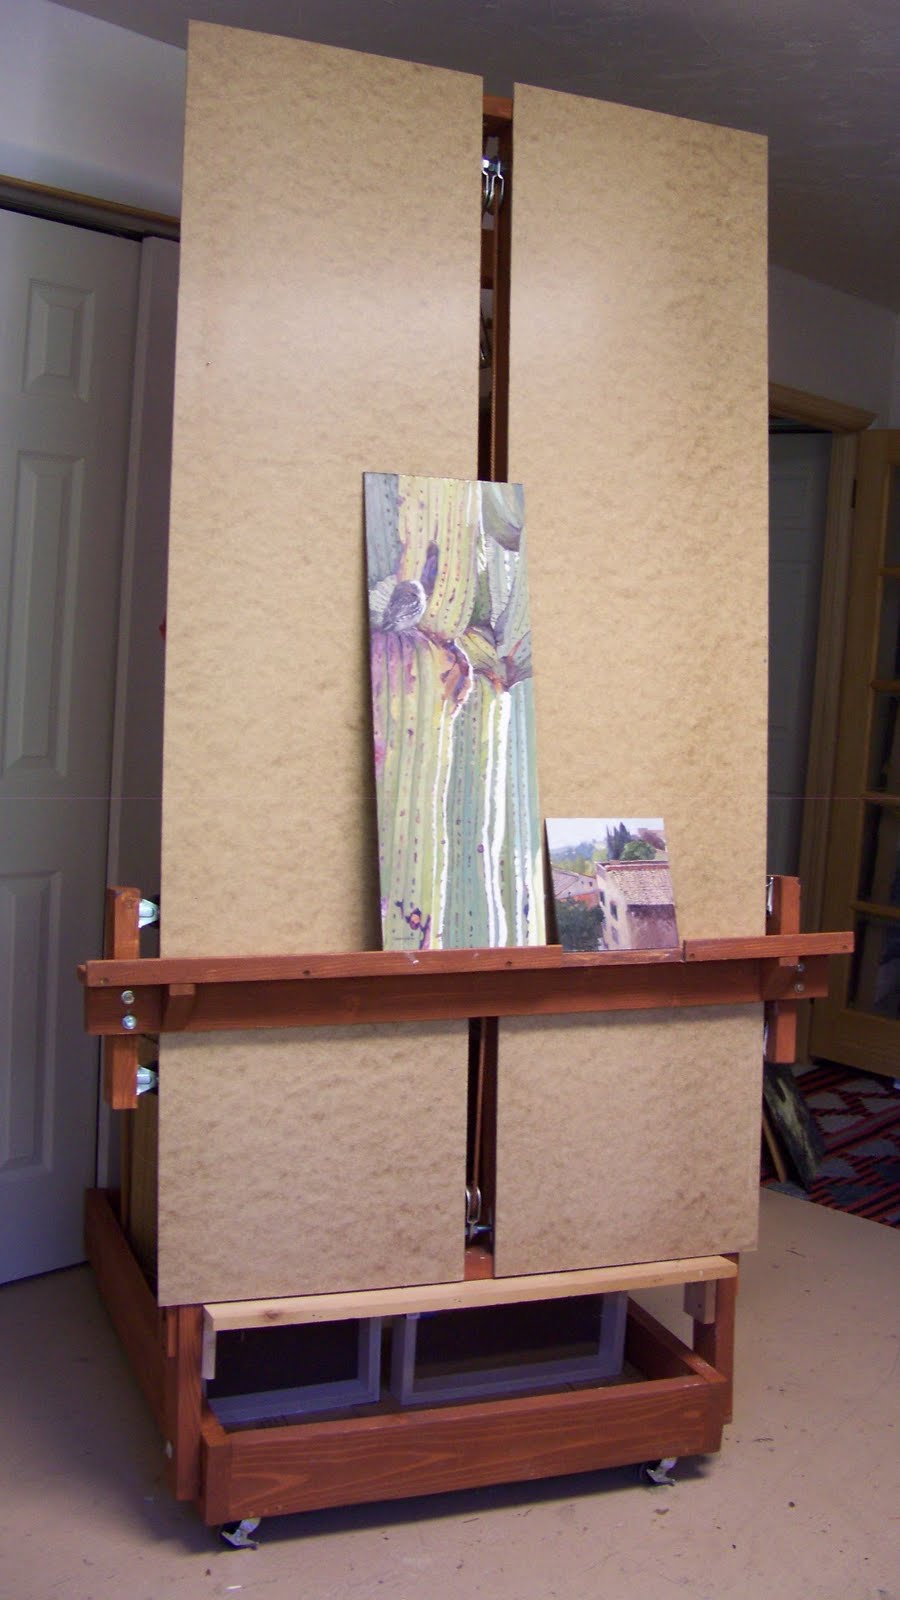
My sister has said for some time that she really needs a new easel, and what she would love to have is a counterweighted easel that will move up and down with just a touch so she can easily adjust the height of the piece she is working on. I came across plans for such an easel on Joshua Been's website a while ago, and Jim (my husband) decided he would like to build one for Adele. It looked pretty simple as it just took a few two by fours, plywood and some hardware, but turned out to be more complicated than we thought it might be. First, the easel is about 10' high and 4' wide. My sister only has 8' ceilings, so it needed to be shortened a bit. Second, the base was 4'x4', which takes up a lot of space, and all the plywood makes it very heavy. So Jim did a little modifying and ended up with and easel just under 8' tall and about 3' wide. The front of it has masonite on it rather than plywood and he left the base open to eliminate some weight.

We drove it out to Arizona and unloaded into Adele's house. We hadn't told her about it yet, and she was thrilled to see it! She is the guinea pig and Jim is asking for suggestions to change the design and make it even better. She has already come up with a couple, which he implemented right away. One was to eliminate a portion of the lip on the tray that holds the canvas or panel in place. He cut out about 6" which now allows her to paint all the way to the bottom of the panel (handy for cradle board and gallery wraps) without the lip getting in the way. He didn't remove the lip entirely as it is needed to keep the canvas from falling off the easel. Second, because she sits to paint, she wanted a footrest, which he added at the bottom. She also wanted plywood in the base so that she could store stuff behind the easel and get it out of the way. I don't know of anyone's studio that has enough space for storage and hers doesn't either. He also had to add more weight in the back to make it easier to move the tray up and down. For that, he used nylon rope tied to round weights with a hole in the middle (free weights that you use while exercising).


Now she just needs to use the easel and give Jim suggestions to improve it further. He may make more easels, and thinks that perhaps he will use beetle killed pine that is so prevalent in our part of the Rocky Mountains. It is an environmentally friendly way to use unwanted wood. With this basic plan, he will be able to custom make each easel for the size of studio it is going in and the needs of the person using it.


Maybe my easel will be next! Do you have suggestions for the next one? I know as Jim makes them, each one will get better than the one before. I know Adele will have her input too!

Wednesday, April 7, 2010

What to do with my failed paintings?


I have quite a few of them! I have been painting less than five years. As a beginner, I have lots of terrible paintings, but I have never thrown one away. Every so often I go through the pile just to show myself that I really have improved! My stack of panels is getting pretty big and I am running out of storage space. I usually use either Pintura panels or RayMar panels, so throwing them away is a bit difficult as I think about how much I have invested in them. This painting did not come from that pile, and it is one I just finished. I must admit part of it was painted twice though!


My artist sister, Adele Earnshaw, calls me at least once a year to tell me that she has found her perfect painting surface. A couple of years ago, it was a very nubby textured linen. That was it! Her masterpieces had a texture she really liked. Then it was gatorboard with clear gesso on it. I tried the clear gesso. It is a bit like painting on blotting paper. (Does anyone even remember what blotting paper is?). Next came Gessobord, her surface of choice for at least a year now.


Today she called me to say that she has now found the really perfect painting surface....old paintings! Ah-hah! I have a whole pile of old panels that will be able to be used again, but with a much better painting this time. Take a look at the one she did today, over top of an old painting of her own. Do you supppose years from now, a museum will be xraying it to see what is underneath?


Why would she like to paint over an old painting? Because it forces her to use thick paint and nice loose brush strokes. I guess I should give it a try myself. Perhaps I will keep a few of those failed paintings after all.....


Saturday, March 27, 2010

Hooray, I got in!


I came home yesterday to a letter from the Evergreen Artist's Association informing me that this painting, Beaver Pond, had been accepted into the Evergreen Art Open. It is a juried show, and I am very pleased, as one of 70 out of 265 entries, to be part of the show. The juror was Doug Dawson, a very respected artist who teaches at the Denver Art Students League, among other places.
We leave for Sedona the first week in April, but will need to be home in time to deliver it to the Center for the Arts in Evergreen on the 18th. The reception will be between 5 and 8pm on Friday, April 23rd. The Center for the Arts is at the corner of Hwy 74 and Squaw Pass Rd in Evergreen, next to the Buchanan Recreation Center.
This is the first time I have entered into anything other than our local co-op gallery, so I am very excited to have had it accepted. In a couple of weeks I will hear if I got into two outdoor shows that I entered. I have hopes for one but I hear the other one is tough to get into, so we will see how those go.

Friday, March 19, 2010

Blue River Artists show at Zoe's


Zoe's Hair Design in Breckenridge is known locally as a place that displays great art as well as a great place for cuts and color. For years, the owner, Donna Miller, has held art shows in her little salon. She moves all the furniture out, hangs the art on the walls, serves wonderful food and wine and gets a huge turnout at the reception! Not only does she bring in a good crowd, she even sells a lot of the artwork.
Thursday, March 25th, some friends and I will have a reception for our Second Annual show. We call ourselves the Blue River Artists. We paint together weekly in Breckenridge, and Donna is one of our members. Several of us also take classes together at both Colorado Mountain College and The Art Student's League in Denver. Our group is informal, but is a great help when we are stuck, or need a little critique to feel like the painting is finished.
The painting above, titled "Meadow's Edge" was painted in our group on a Sunday night. It is 9x12 and will be one of several at Zoe's.


Our reception is from 5pm to 7pm on Thursday. Hope to see you there!


Friday, March 12, 2010

High Mountain Lake


One of the things I love to paint is fall color. However, sometimes I think that my artwork can get a bit boring if the entire gallery wall is nothing but fall leaves. This little 6"x8" painting reflects fall color, but no aspen this time. The color comes from the ground covers that are found up high. The photo I used as reference was one I took on a hike. I don't remember exactly where it was, but I know it was a long climb up there!

Saturday, February 27, 2010

Learning how to submit applications for shows

I don't know Photoshop. I wish I did! My nephew, Illustrator Shane Rebenschied has written books about it, but I think those genes came from a different side of the family. And he lives in Arizona while I am in Colorado. No asking for help there. So, I spent a couple of evenings and learned the few little things I needed to know to submit photos to Zapplication so that I can enter some summer shows.


Many shows will only accept applicatons through this website, and it is pretty easy once you figure out how to do what is required. Uploading a photo is a piece of cake, but making sure that it is 1920 pixels on the longest side, that it is no more than 2MB but still high resolution, and that my name did not show up on the photo, is not as easy as I thought it might be. I always take my photos so they are at least 2MB, but once I cropped them to get rid of the frames, they were less than 1920 pixels on the longest side. I retook the photos with the camera set at 3.1MB, then once I cropped, I was able to resize the image to 1920 pixels.


Step two was getting rid of my signature. The first photo is one of the paintings with my signature. I have marveled at how people can just get rid of things in a photo. I recently had a good (for once!) photo taken, but had a candlestick growing out of my head. My daughter is good at photoshop, and she just eliminated it. I had to figure out how to do that with my signature on my painting. It actually isn't too hard. First I zoomed in on the area where my signature was, then I chose the clone tool (it looks like a picture of a rubber stamp). To eliminate the signature, you have to select a color very near the section of the signature you want to cover up by doing an Alt-click, then click on the area you want gone. It will clone the area you first clicked on and duplicate it with the second click. It takes lots of clicking, especially if the painting has a lot of color changes and brush strokes under the signature. Here is the painting without the signature.


Oh-oh, I hadn't compared the two before, but it looks like the color in my second one isn't as good. The first photo is the better of the two. I didn't change that in photoshop. They are two different photos taken at different times as I had to start over. Live and learn! I have been doing a lot of that lately.
The third step is to save it at the right size. The first time through I didn't realize it was preset to about 57 kb, which is too small. You cannot resize a small file and make it larger, so I had to redo the whole thing and this time save it as a 2MB file. That was why it took two evenings!

Good practice though. I submitted my application for the outdoor art show in Crested Butte, Colorado this summer. I hear it is a difficult show to get in, so I don't expect to be accepted, but I definitely wouldn't be if I didn't apply!

Friday, February 19, 2010

No snow needed on opening day!


Here in Summit County, Colorado, it takes a lot of snow to keep us from doing things. We love snow and the ski resorts in the county, (Breckenridge, Keystone and Copper Mountain) depend on it. We have not had a lot of snow this season. In February, I usually have at least three feet in my yard, but this year I have perhaps a foot. Unlike most of you, when we hear that the forecasters are predicting snow, we cheer....except when I have the reception for my art show!


Not only did the date (always the Second Saturday of the month) fall on a holiday weekend when there are lots of tourists in town, it also snowed. Traffic was awful and the snow made it worse. As a result, the number of visitors to the gallery wasn't what I had hoped. I sent or gave out about 130 invitations and sent a press release to the local newspaper, and I had many people tell me that they would definitely be there. In fact, they were looking forward to it!


So it snowed. While the turnout was still better than average, I was disappointed as I knew it could have been much better. However, many people have since gone to visit the gallery and have commented favorably on my work. I took my camera that night, but of course, forgot to take any photos. I did take a couple of the featured wall display right after I hung it. A bit crowded, but we don't have a lot of space and I had a lot of work. This was one of two walls, but the one with the most impact as it was right by the front door.